Jump to:
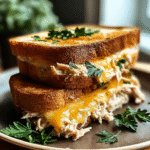
Perfect Cheesy Tuna Melts Recipe
Cheesy tuna melts are the ultimate comfort food that combines protein-rich tuna with melted cheese on crispy bread. This simple yet satisfying recipe costs under $8 to make and serves two people perfectly. You’ll love how this budget-friendly meal delivers restaurant-quality results in just 20 minutes.
Perfect for busy weeknight dinners or casual family gatherings, these melts pack 25 grams of protein per serving. The combination of omega-3 rich tuna and calcium-loaded cheese makes this a nutritious choice for growing families.
Why You'll Love This Recipe
- Ready in 20 minutes with minimal prep work required
- Budget-friendly meal costing less than $4 per serving
- High protein content keeps you satisfied for hours
Why This Cheesy Tuna Melts Recipe Works
This recipe works because it balances creamy tuna filling with perfectly melted cheese. The mayonnaise creates moisture while the cheese blend adds richness and flavor depth.
Using medium heat prevents burning while ensuring the cheese melts completely. The bread gets golden and crispy while the inside stays warm and gooey. This technique creates the perfect texture contrast that makes great tuna melts so irresistible.
High-quality tuna makes a significant difference in taste. Full-fat mayonnaise creates better binding than low-fat versions. The cheese combination provides both stretch and flavor complexity.

What You’ll Need for These Amazing Cheesy Tuna Melts
Gathering the right ingredients and tools ensures your cheesy tuna melts turn out perfectly every time. Quality ingredients make a noticeable difference in the final result.
Ingredients
| Ingredient | Quantity (Approx) | Purpose / Notes |
|---|---|---|
| High-quality tuna | 1 can (5 oz) | Protein base, choose solid white albacore |
| Mayonnaise | 2 tbsp | Binds mixture, adds creaminess |
| Shredded cheese | 1 cup | Melts perfectly, use cheddar-mozzarella mix |
| Hearty bread | 4 slices | Holds filling well, sourdough preferred |
| Onion powder | 1/2 tsp | Adds savory depth without chunks |
| Fresh parsley | Optional | Color and fresh herb flavor |
Tools
| Tool | Purpose |
|---|---|
| Non-stick skillet | Even cooking and easy flipping |
| Mixing bowl | Combines tuna mixture ingredients |
| Spatula | Flips sandwiches without breaking |
| Can opener | Opens tuna can safely |
How to Make Perfect Cheesy Tuna Melts
Follow these simple steps to create restaurant-quality cheesy tuna melts at home. Each step builds flavor and ensures perfect texture.
| Step | Instructions |
|---|---|
| 1. Prep | Preheat skillet over medium heat for even cooking |
| 2. Mix filling | Combine drained tuna, mayonnaise, onion powder, and parsley until creamy |
| 3. Assemble | Spread tuna mixture on two bread slices, top with cheese, add remaining bread |
| 4. Cook | Melt butter in skillet, grill sandwiches 3-4 minutes per side until golden |
| 5. Serve | Remove from heat, slice in half, serve immediately while hot |
Press down gently while cooking to help cheese melt evenly. Don’t rush the process – medium heat prevents burning while ensuring thorough heating.
Chef's Helpful Tips
- Drain tuna completely to prevent soggy sandwiches
- Mix cheeses for better melting and flavor complexity
- Let sandwiches rest 1 minute before slicing for cleaner cuts
Serving and Storage Tips for Cheesy Tuna Melts
Proper serving and storage keep your cheesy tuna melts fresh and delicious. These tips help you enjoy leftovers safely.
Serving Tips
Serve immediately while cheese is still melted and bread is crispy. Cut diagonally for easier eating and better presentation.
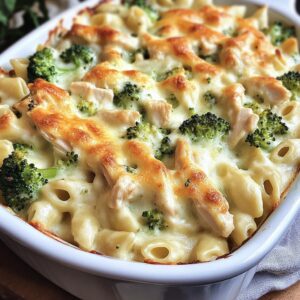
Pair with crispy pickles or fresh fruit for balanced flavors. A simple side salad complements the richness perfectly. Consider serving with hearty casseroles for larger gatherings.
Store leftover tuna mixture in the refrigerator for up to 2 days. Reheat assembled melts in a skillet rather than microwave for best texture.

Mistakes to Avoid while making Cheesy Tuna Melts
Avoiding common mistakes ensures perfect results every time. These pitfalls can ruin texture and flavor.
Don’t use too much mayonnaise – it makes sandwiches soggy. Avoid cooking on high heat, which burns bread before cheese melts.
Never skip draining the tuna properly. Excess liquid creates messy, wet sandwiches that fall apart. Don’t press too hard while cooking, as this squeezes out filling.
Using stale bread results in poor texture. Fresh, sturdy bread holds up better during cooking. Check out professional techniques for perfect results.
You Must Know
- Always use medium heat to prevent burning while melting cheese
- Drain tuna thoroughly to avoid soggy, messy sandwiches
- Choose sturdy bread that won’t fall apart when heated
Suggestions for Better Cheesy Tuna Melts
Enhance your cheesy tuna melts with these creative variations. Small changes create exciting new flavors.
Add sliced tomatoes for freshness and acidity. Try different cheese combinations like Swiss and cheddar for unique taste profiles.
Consider adding chopped celery for crunch or capers for briny flavor. Experiment with different bread types like rye or whole grain.
For spice lovers, add a dash of hot sauce to the tuna mixture. Fresh herbs like dill or chives provide aromatic complexity. Try pairing with creamy pasta dishes for complete meals.

FAQs:
Prepare the tuna mixture up to 2 days ahead, but assemble and cook just before serving for best texture.
Sourdough or whole grain bread works best as they’re sturdy enough to hold the filling without getting soggy.
Yes! Try Swiss, provolone, or sharp cheddar. Mixing cheeses creates better flavor and melting properties.
Drain tuna completely and don’t use too much mayonnaise. Cook on medium heat for proper moisture balance.
Absolutely! Sliced tomatoes, onions, or lettuce work well. Add them just before serving to maintain crispness.
Conclusion
These perfect cheesy tuna melts deliver comfort food satisfaction in just 20 minutes. With simple ingredients and easy techniques, you’ll create restaurant-quality results at home.
The combination of protein-rich tuna, melted cheese, and crispy bread makes this recipe a family favorite. At under $4 per serving, it’s both budget-friendly and nutritious.
Try this recipe for your next quick dinner or casual lunch. The versatility allows for endless customization while maintaining the classic appeal that makes cheesy tuna melts timeless comfort food.
More Easy Recipes Recipes:
- Best Sausage Tomato Cheese Omelet Recipe – Easy & Delicious
- Refreshing Infused Water with Peach and Mint Recipe – Peach Mint Infused Water
- Best Strawberry Ice Cream Sandwiches Recipe – Easy
- Dump-and-Bake Meatball Casserole: An Easy Italian Meatball Pasta Bake
Recommended


📖 Recipe Card
Cheesy Tuna Melts
- Total Time: 20 minutes
- Yield: 25 grams of protein per serving 1x
Description
A delicious and easy recipe for cheesy tuna melts that combines high-quality tuna with melted cheese on hearty bread for a perfect comfort food meal.
Ingredients
- 1 can (5 oz) high-quality tuna
- 2 tbsp mayonnaise
- 1 cup shredded cheese
- 4 slices hearty bread
- 1/2 tsp onion powder
- Fresh parsley (optional)
- Butter for cooking
Instructions
- Prep: Preheat skillet over medium heat for even cooking
- Mix filling: Combine drained tuna, mayonnaise, onion powder, and parsley until creamy
- Assemble: Spread tuna mixture on two bread slices, top with cheese, add remaining bread
- Cook: Melt butter in skillet, grill sandwiches 3-4 minutes per side until golden
- Serve: Remove from heat, slice in half, serve immediately while hot
Notes
- Drain tuna completely to prevent soggy sandwiches
- Mix cheeses for better melting and flavor complexity
- Let sandwiches rest 1 minute before slicing for cleaner cuts
- Press down gently while cooking to help cheese melt evenly
- Prep Time: 10 minutes
- Cook Time: 10 minutes
- Category: Main Course
- Method: Pan-frying
- Cuisine: American
Nutrition
- Serving Size: 1 sandwich
- Calories: 485 calories
- Sugar: 4g
- Sodium: 920mg
- Fat: 22g
- Saturated Fat: 10g
- Unsaturated Fat: 12g
- Trans Fat: 0g
- Carbohydrates: 38g
- Fiber: 2g
- Protein: 25g
- Cholesterol: 65mg
Keywords: cheesy tuna melts, tuna sandwich, melted cheese, comfort food, easy lunch, quick dinner