Jump to:
Chicken Onigiri Fusion: The Perfect East-Meets-West Rice Ball Recipe
Chicken onigiri fusion brings together the best of Japanese tradition and Western flavors in one delicious handheld meal. This protein-packed rice ball combines tender, seasoned chicken with perfectly seasoned sushi rice, creating a satisfying snack that’s perfect for busy weekdays, lunch boxes, or family gatherings. With just 30 minutes of prep and cook time, you’ll have a nutritious meal that costs under $12 to make and serves four people generously.
Why You'll Love This Recipe
- Budget-friendly meal using simple ingredients that cost less than $3 per serving while providing complete nutrition
- Perfect portable food for work lunches, picnics, or after-school snacks that stays fresh for hours
- High protein content from chicken breast supports muscle health and keeps you satisfied longer
- Customizable recipe that works with different seasonings, vegetables, or dietary preferences
- Kid-friendly finger food that introduces children to international flavors in a familiar format
Why This Chicken Onigiri Fusion Recipe Works
This fusion recipe succeeds because it balances authentic Japanese techniques with accessible Western ingredients. The short-grain sushi rice provides the perfect sticky texture needed for shaping, while the garlic-soy chicken adds familiar flavors that appeal to all palates.
The cooking method ensures the chicken stays moist and flavorful. By marinating the warm chicken in the soy-garlic mixture, the meat absorbs maximum flavor while remaining tender. This technique creates depth that traditional onigiri fillings sometimes lack.
Nutritionally, each serving provides approximately 25 grams of protein, complex carbohydrates from rice, and essential amino acids. The combination makes this recipe ideal for post-workout meals, growing children, or anyone seeking sustained energy throughout the day.

What You’ll Need for Perfect Chicken Onigiri Fusion
Ingredients
| Ingredient | Quantity (Approx) | Purpose / Notes |
|---|---|---|
| Boneless chicken breasts | 3-4 pieces (1 pound) | Main protein source, provides structure and flavor |
| Fresh garlic | 3 cloves, minced | Adds aromatic depth and complements soy sauce |
| Low-sodium soy sauce | 3 tablespoons | Primary seasoning agent for umami flavor |
| Short-grain sushi rice | 2 cups cooked | Provides sticky texture essential for shaping onigiri |
| Nori sheets | 4 sheets, cut into strips | Traditional wrapper that adds mineral content and crunch |
| Salt and pepper | To taste | Basic seasoning for chicken preparation |
Tools
| Tool | Purpose |
|---|---|
| Medium skillet | Cooks chicken evenly with proper heat distribution |
| Two forks | Essential for shredding cooked chicken into perfect bite-sized pieces |
| Mixing bowl | Combines marinade ingredients and allows proper chicken coating |
| Rice cooker or pot | Prepares sushi rice to ideal consistency for molding |
| Clean kitchen towel | Keeps hands moist during onigiri assembly process |
How to Make Chicken Onigiri Fusion
| Step | Instructions |
|---|---|
| 1. Prepare the Chicken | Preheat skillet over medium heat. Season chicken breasts with salt and pepper. Cook for 6-7 minutes per side until golden brown and internal temperature reaches 165°F. Remove from heat and let cool for 5 minutes. |
| 2. Create the Marinade | In a mixing bowl, combine soy sauce and minced garlic. Mix thoroughly to create an even marinade that will penetrate the warm chicken effectively. |
| 3. Shred and Marinate | Using two forks, shred the slightly cooled chicken into bite-sized pieces. Pour the soy-garlic mixture over the shredded chicken and toss to coat evenly. Let marinate for 10 minutes. |
| 4. Prepare the Rice | Cook sushi rice according to package directions. Allow rice to cool until warm but manageable to touch. The rice should still be slightly sticky for proper onigiri formation. |
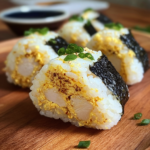
| 5. Shape the Onigiri | Wet your hands with clean water to prevent sticking. Take a handful of rice, create a small well in the center, add 2-3 tablespoons of chicken filling, then cover with more rice and mold into triangular shapes. |
| 6. Add Final Touches | Wrap each onigiri with a strip of nori seaweed. Press gently to ensure the nori adheres to the rice. Serve immediately or store for later consumption. |
Chef's Helpful Tips
- Keep your hands consistently moist while shaping onigiri to prevent rice from sticking and ensure smooth surfaces
- Don’t overfill the rice balls with chicken as this makes them difficult to shape and prone to falling apart
- Allow chicken to marinate while still warm for maximum flavor absorption and better seasoning distribution
- Use day-old rice if possible as it has the ideal texture and moisture content for onigiri making
- Press firmly but gently when shaping to create compact onigiri that hold together without becoming dense
Serving and Storage Tips for Chicken Onigiri Fusion
Serving Tips
Serve your chicken onigiri fusion at room temperature for the best flavor experience. The rice maintains its ideal texture, and the chicken flavors are most pronounced when not cold. Arrange on a platter with small bowls of extra soy sauce, wasabi, or pickled ginger for dipping.
These rice balls work perfectly for bento boxes, picnic lunches, or as appetizers for dinner parties. Consider pairing them with other Japanese-inspired dishes for a complete themed meal that impresses guests.
For storage, wrap individual onigiri in plastic wrap and refrigerate for up to 3 days. The nori may soften slightly, but the flavors actually improve as they meld together. Avoid freezing as this affects the rice texture negatively.

Mistakes to Avoid while making Chicken Onigiri Fusion
The most common mistake is using long-grain rice instead of short-grain sushi rice. Long-grain rice lacks the stickiness needed for proper onigiri formation and will result in rice balls that fall apart easily.
Overcooking the chicken creates dry, tough filling that doesn’t absorb the marinade well. Cook just until the internal temperature reaches 165°F, then remove immediately to retain moisture and tenderness.
Another frequent error is assembling onigiri with hot rice. This makes handling difficult and can result in burns. Always let rice cool to a warm, manageable temperature before shaping.
Don’t skip wetting your hands during assembly. Dry hands cause rice to stick excessively, making it impossible to create smooth, well-shaped onigiri. Keep a bowl of clean water nearby for frequent hand moistening.
You Must Know
- Always use sushi rice or short-grain rice as other varieties won’t provide the necessary stickiness for proper onigiri formation
- Cook chicken to exactly 165°F internal temperature to ensure food safety while maintaining optimal texture and moisture
- Wet hands are essential throughout the assembly process to prevent sticking and achieve professional-looking results
- Store assembled onigiri in the refrigerator and consume within 3 days for best quality and food safety
Suggestions for Chicken Onigiri Fusion Variations
Transform your chicken onigiri fusion by experimenting with different seasonings and ingredients. Try adding teriyaki sauce to the chicken marinade for a sweeter profile, or incorporate sriracha for heat lovers.
Vegetable additions work wonderfully in this recipe. Finely diced carrots, bell peppers, or green onions add color, nutrition, and texture variety. Mix these directly into the rice or combine with the chicken filling.
For different protein options, substitute the chicken with cooked salmon, tuna, or even seasoned shrimp. Each protein brings unique flavors while maintaining the recipe’s core appeal and nutritional benefits.
Consider seasonal variations by incorporating ingredients like corn in summer or roasted sweet potato in fall. These additions create exciting flavor profiles while keeping the fundamental technique intact.

FAQs:
Yes, you can prepare chicken onigiri fusion up to 3 days in advance. Wrap each onigiri individually in plastic wrap and store in the refrigerator. The flavors actually improve as they meld together, though the nori may soften slightly.
Short-grain sushi rice is essential for proper onigiri formation. This rice variety has the necessary starch content to create the sticky texture needed for shaping. Long-grain or jasmine rice won’t work as they lack sufficient stickiness.
Keep your hands consistently moist with clean water throughout the assembly process. Have a bowl of water nearby and wet your hands frequently. This prevents sticking and allows you to shape smooth, professional-looking onigiri.
Freezing is not recommended as it significantly affects the rice texture, making it grainy and unpleasant when thawed. Instead, store in the refrigerator for up to 3 days for optimal quality and food safety.
Cooked salmon, tuna, shrimp, or even seasoned tofu work excellently as substitutes. Use the same marinade technique with your chosen protein, adjusting cooking times as needed to ensure proper doneness and flavor absorption.
Conclusion: Mastering Your Chicken Onigiri Fusion Journey
Chicken onigiri fusion represents the perfect marriage of traditional Japanese techniques with accessible Western flavors. This versatile recipe provides a nutritious, budget-friendly meal that works for any occasion, from casual family dinners to elegant appetizer spreads.
The key to success lies in using proper sushi rice, maintaining moist hands during assembly, and allowing the chicken to marinate while warm for maximum flavor absorption. With practice, you’ll create professional-quality onigiri that rivals those from specialty Japanese restaurants.
Remember that this recipe serves as a foundation for endless creativity. Experiment with different seasonings, vegetables, and proteins to create your signature version. Each variation teaches you more about flavor balance and technique, building your confidence in fusion cooking.
More Easy Lunch Recipes:
- Vibrant Lemon Herb Chicken Stir-Fry for Family Dinner
- Spicy Cucumber Salad: Amazing Asian Recipe Ready in Minutes
- Cheesy Sloppy Joe Toast – Easy 30-Minute Comfort Recipe
- Roasted Beet Fig Salad – Easy Recipe with Feta & Arugula
Recommended
📖 Recipe Card
Chicken Onigiri Fusion
- Total Time: 30 minutes
- Yield: 3 per serving 1x
Description
A delicious fusion recipe combining tender marinated chicken with traditional Japanese onigiri rice balls, wrapped in nori for the perfect handheld meal.
Ingredients
- 3–4 pieces (1 pound) boneless chicken breasts
- 3 cloves, minced fresh garlic
- 3 tablespoons low-sodium soy sauce
- 2 cups cooked short-grain sushi rice
- 4 sheets, cut into strips nori sheets
- To taste salt and pepper
Instructions
- Prepare the Chicken: Preheat skillet over medium heat. Season chicken breasts with salt and pepper. Cook for 6-7 minutes per side until golden brown and internal temperature reaches 165°F. Remove from heat and let cool for 5 minutes.
- Create the Marinade: In a mixing bowl, combine soy sauce and minced garlic. Mix thoroughly to create an even marinade that will penetrate the warm chicken effectively.
- Shred and Marinate: Using two forks, shred the slightly cooled chicken into bite-sized pieces. Pour the soy-garlic mixture over the shredded chicken and toss to coat evenly. Let marinate for 10 minutes.
- Prepare the Rice: Cook sushi rice according to package directions. Allow rice to cool until warm but manageable to touch. The rice should still be slightly sticky for proper onigiri formation.
- Shape the Onigiri: Wet your hands with clean water to prevent sticking. Take a handful of rice, create a small well in the center, add 2-3 tablespoons of chicken filling, then cover with more rice and mold into triangular shapes.
- Add Final Touches: Wrap each onigiri with a strip of nori seaweed. Press gently to ensure the nori adheres to the rice. Serve immediately or store for later consumption.
Notes
- Keep your hands consistently moist while shaping onigiri to prevent rice from sticking and ensure smooth surfaces
- Don’t overfill the rice balls with chicken as this makes them difficult to shape and prone to falling apart
- Allow chicken to marinate while still warm for maximum flavor absorption and better seasoning distribution
- Use day-old rice if possible as it has the ideal texture and moisture content for onigiri making
- Prep Time: 15 minutes
- Cook Time: 15 minutes
- Category: Main Course
- Method: Pan-frying and Assembly
- Cuisine: Japanese Fusion
Nutrition
- Serving Size: 2 onigiri
- Calories: 385 calories
- Sugar: 1g
- Sodium: 620mg
- Fat: 4g
- Saturated Fat: 1g
- Unsaturated Fat: 3g
- Trans Fat: 0g
- Carbohydrates: 52g
- Fiber: 2g
- Protein: 35g
- Cholesterol: 85mg
Keywords: chicken onigiri fusion, Japanese fusion, rice balls, chicken onigiri, Asian fusion recipe, handheld meal


