Jump to:
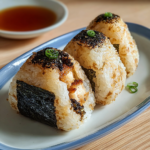
Chicken Onigiri Japanese Rice – Chicken Onigiri Recipe
This chicken onigiri recipe transforms simple ingredients into portable Japanese rice balls packed with savory shredded chicken. Perfect for lunch boxes, picnics, or quick snacks, these triangular treats offer a delicious way to enjoy traditional Japanese flavors at home. Each bite combines perfectly seasoned sushi rice with tender, flavorful chicken filling that will satisfy your cravings.
Why You'll Love This Recipe
- Budget-friendly meal using affordable chicken and rice that feeds a family of four for under $10
- Portable and convenient for busy lifestyles, perfect for work lunches or school meals
- High protein content from chicken provides sustained energy and supports muscle health
- Customizable recipe that allows you to adjust seasonings and add your favorite ingredients
- Make-ahead friendly option that stays fresh for days when properly stored
Why This Chicken Onigiri Recipe Works
The magic lies in the perfect balance of textures and flavors. The slightly sweet soy sauce coating penetrates the shredded chicken, creating umami-rich filling. Meanwhile, the rice vinegar adds subtle tang to the sushi rice, preventing it from becoming too sticky while maintaining the ideal consistency for shaping.
This recipe works because it uses simple cooking techniques that anyone can master. Boiling the chicken ensures moist, tender meat that shreds easily. The warm rice molds perfectly around the filling, creating secure pockets that won’t fall apart during eating.

What You’ll Need for This Chicken Onigiri Recipe
Ingredients
| Ingredient | Quantity (Approx) | Purpose / Notes |
|---|---|---|
| Boneless, skinless chicken breasts | 3-4 pieces (1 lb) | Main protein filling, provides savory flavor |
| Fresh garlic | 3 cloves, minced | Adds aromatic depth to chicken |
| Low-sodium soy sauce | 1/4 cup | Creates umami-rich coating for chicken |
| Sugar | 1 tablespoon | Balances saltiness, adds subtle sweetness |
| Sushi rice | 2 cups | Short-grain rice that holds shape well |
| Rice vinegar | 2 tablespoons | Seasons rice, prevents excessive stickiness |
Tools
| Tool | Purpose |
|---|---|
| Large pot | Boiling chicken and cooking rice |
| Two forks | Shredding cooked chicken easily |
| Mixing bowls | Combining sauce ingredients and chicken |
| Rice cooker or saucepan | Cooking sushi rice to perfect texture |
| Plastic wrap | Storing finished onigiri for later |
How to Make Chicken Onigiri Recipe
| Step | Instructions |
|---|---|
| Step 1: Cook Chicken | Boil chicken breasts in water for 15-20 minutes until fully cooked. Season with salt or herbs if desired for extra flavor. |
| Step 2: Shred Chicken | Let chicken cool slightly, then shred using two forks. Work in opposite directions to create fine, even strands. |
| Step 3: Make Sauce | Combine soy sauce and sugar in bowl until dissolved. Toss shredded chicken in sauce until evenly coated. |
| Step 4: Prepare Rice | Rinse sushi rice under cold water until clear. Cook according to package instructions, about 20 minutes. Stir in rice vinegar after cooking. |
| Step 5: Form Onigiri | With wet hands, take handful of warm rice, flatten in palm, add chicken mixture in center, and shape into triangles or balls. |
| Step 6: Serve | Enjoy immediately while warm or wrap in plastic wrap for later consumption. |
Chef's Helpful Tips
- Keep your hands slightly damp when forming onigiri to prevent rice from sticking to your palms
- Don’t overfill the rice balls – too much filling makes them difficult to seal and prone to breaking
- Use warm rice for easier shaping, but let it cool slightly to avoid burning your hands
- Press firmly but gently when forming triangles to ensure they hold together without becoming dense
- Taste the chicken mixture before assembly and adjust seasoning as needed for your preference
Serving and Storage Tips for Chicken Onigiri Recipe
Serving Tips
Serve these traditional Japanese rice balls at room temperature for the best texture and flavor. They make excellent additions to bento boxes alongside fresh vegetables and pickled items.
For special occasions, arrange onigiri on a platter with different shapes – triangles, balls, and cylinders create visual interest. Consider serving with miso soup or green tea for an authentic Japanese meal experience.
Store leftover onigiri in the refrigerator for up to three days wrapped in plastic wrap. For longer storage, freeze them for up to one month. Thaw frozen onigiri overnight in the refrigerator before eating.

Mistakes to Avoid while making Chicken Onigiri Recipe
Don’t use hot rice straight from the cooker – it will burn your hands and make shaping impossible. Let it cool for 5-10 minutes until comfortably warm.
Avoid using long-grain rice instead of sushi rice. Regular rice lacks the sticky texture needed to hold onigiri together properly. The short-grain variety is essential for success.
Never skip wetting your hands before handling rice. Dry hands cause rice to stick everywhere except where you want it, making the process frustrating and messy.
Don’t compress the rice too tightly when forming shapes. Over-packing creates dense, heavy onigiri that lose their light, fluffy texture. Gentle but firm pressure works best.
You Must Know
- Onigiri taste best when eaten within 24 hours of making for optimal rice texture and freshness
- Salt your hands lightly before shaping to add subtle seasoning to the rice exterior
- Room temperature onigiri have better flavor than cold ones straight from the refrigerator
- This recipe provides approximately 25 grams of protein per serving, making it a substantial meal option
Suggestions for Chicken Onigiri Recipe
Transform this basic recipe by adding sesame seeds to the rice for extra crunch and nutty flavor. Mix them in with the rice vinegar for even distribution throughout.
Create variety by incorporating different vegetables into the chicken mixture. Finely chopped green onions, shredded carrots, or corn kernels add color and nutrition.
For spice lovers, add a pinch of red pepper flakes to the soy sauce mixture. This creates a gentle heat that complements the savory chicken without overwhelming the delicate rice.
Consider making a larger batch and experimenting with different fillings. This technique works beautifully with other proteins, making it similar to our ultimate chicken casserole in its versatility.
Try wrapping finished onigiri in nori (seaweed sheets) for authentic presentation and additional umami flavor. Cut nori into strips and wrap around the base of each rice ball.
For meal prep enthusiasts, this recipe pairs wonderfully with other make-ahead options like our creamy garlic shrimp pasta for weekly meal planning variety.

FAQs:
Yes, but reheat leftover rice with a splash of water to restore moisture and make it pliable for shaping. Cold, dry rice won’t hold together properly.
Fresh onigiri stay good for 3 days refrigerated or 1 month frozen. Wrap each one individually in plastic wrap to maintain moisture and prevent rice from hardening.
Absolutely! Replace chicken with seasoned mushrooms, pickled vegetables, or seasoned tofu for delicious vegetarian alternatives that work perfectly with this rice preparation method.
Microwave for 30-45 seconds wrapped in damp paper towel, or steam gently for 2-3 minutes. Avoid overheating as it makes rice mushy and unpleasant.
Yes! Ginger, sesame oil, or rice wine vinegar work wonderfully. Start with small amounts and adjust to taste, as these flavors can easily overpower the delicate rice.
Conclusion
This chicken onigiri recipe delivers authentic Japanese flavors using simple, accessible ingredients. The combination of tender seasoned chicken and perfectly prepared sushi rice creates satisfying portable meals perfect for any occasion.
Whether you’re packing lunch boxes, planning picnic foods, or exploring Japanese cuisine variations, these rice balls offer endless possibilities. Master this basic technique and you’ll have a versatile recipe that adapts to your family’s preferences and dietary needs.
Start making your chicken onigiri today and discover why this traditional Japanese comfort food has gained popularity worldwide. Your taste buds will thank you for this delicious, nutritious addition to your recipe collection.
More Easy Dinner Recipes:
- Asian Chicken Soba Noodles Recipe – Easy 30-Minute Dinner
- Creamy Chicken Gnocchi Soup: Perfect Comfort Food Recipe
- Irresistible Homestyle Sweet Potato Black Bean Wraps
- Best Crockpot Tuscan Garlic Chicken Recipe – Easy & Creamy
Recommended


📖 Recipe Card
Chicken Onigiri Recipe
- Total Time: 45 minutes
- Yield: 25 grams of protein per serving 1x
Description
A delicious and easy recipe for Chicken Onigiri Recipe that combines tender shredded chicken with perfectly seasoned sushi rice, formed into traditional Japanese rice balls.
Ingredients
- 3–4 pieces (1 lb) Boneless, skinless chicken breasts
- 3 cloves, minced Fresh garlic
- 1/4 cup Low-sodium soy sauce
- 1 tablespoon Sugar
- 2 cups Sushi rice
- 2 tablespoons Rice vinegar
Instructions
- Step 1: Cook Chicken – Boil chicken breasts in water for 15-20 minutes until fully cooked. Season with salt or herbs if desired for extra flavor.
- Step 2: Shred Chicken – Let chicken cool slightly, then shred using two forks. Work in opposite directions to create fine, even strands.
- Step 3: Make Sauce – Combine soy sauce and sugar in bowl until dissolved. Toss shredded chicken in sauce until evenly coated.
- Step 4: Prepare Rice – Rinse sushi rice under cold water until clear. Cook according to package instructions, about 20 minutes. Stir in rice vinegar after cooking.
- Step 5: Form Onigiri – With wet hands, take handful of warm rice, flatten in palm, add chicken mixture in center, and shape into triangles or balls.
- Step 6: Serve – Enjoy immediately while warm or wrap in plastic wrap for later consumption.
Notes
- Keep your hands slightly damp when forming onigiri to prevent rice from sticking to your palms
- Don’t overfill the rice balls – too much filling makes them difficult to seal and prone to breaking
- Use warm rice for easier shaping, but let it cool slightly to avoid burning your hands
- Press firmly but gently when forming triangles to ensure they hold together without becoming dense
- Prep Time: 15 minutes
- Cook Time: 30 minutes
- Category: Main Course
- Method: Boiling and Shaping
- Cuisine: Japanese
Nutrition
- Serving Size: 1 onigiri
- Calories: 285 calories
- Sugar: 3g
- Sodium: 520mg
- Fat: 3g
- Saturated Fat: 1g
- Unsaturated Fat: 2g
- Trans Fat: 0g
- Carbohydrates: 45g
- Fiber: 1g
- Protein: 25g
- Cholesterol: 65mg
Keywords: Chicken Onigiri Recipe, Japanese rice balls, onigiri, chicken filling, sushi rice, Japanese cuisine, portable meal