Jump to:
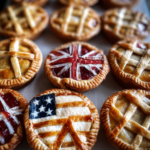
Mini Flag Pies
Mini flag pies are the perfect patriotic treats that combine delicious savory flavors with festive presentation. These handheld delights feature flaky puff pastry filled with seasoned ground meat, cheese, and vegetables, making them ideal for holiday gatherings, potlucks, or any celebration where you want to show your patriotic spirit.
Why You'll Love This Recipe
- Perfect portion control with individual mini servings that are easy to grab and enjoy
- Versatile filling options allow you to customize flavors based on your preferences
- Beautiful patriotic presentation makes them perfect for Fourth of July and Memorial Day celebrations
- Make-ahead friendly recipe that can be prepared in advance and baked when needed
- Kid-friendly finger food that appeals to all ages and dietary preferences
Why This Mini Flag Pies Recipe Works
This recipe succeeds because it balances simplicity with impressive results. The puff pastry provides a buttery, flaky exterior that contrasts beautifully with the savory filling inside.
The combination of ground meat, cheese, and vegetables creates a well-rounded flavor profile. Each bite delivers protein, vegetables, and satisfying textures that keep you coming back for more.
The individual portion size makes these pies perfect for parties and gatherings. Guests can easily grab one without needing plates or utensils, making them ideal for outdoor celebrations.
Why You’ll Love This Mini Flag Pies Recipe
These mini flag pies offer incredible versatility in both preparation and serving. You can customize the filling to match your family’s preferences or dietary restrictions.
The recipe scales easily for large gatherings. Simply double or triple the ingredients to feed a crowd without complicated calculations or timing adjustments.
Visual appeal makes these pies conversation starters at any event. The golden-brown pastry and colorful filling create an appetizing presentation that photographs beautifully for social media sharing.

What You’ll Need
Ingredients
| Ingredient | Quantity (Approx) | Purpose / Notes |
|---|---|---|
| Puff Pastry Sheets | 2 sheets (thawed) | Provides flaky, buttery exterior crust |
| Ground Meat | 1 lb (beef, chicken, or turkey) | Main protein component of filling |
| Cheddar Cheese | 1 cup (shredded) | Adds sharp, tangy flavor and richness |
| Mozzarella Cheese | 1 cup (shredded) | Provides creamy texture and mild flavor |
| Chopped Onions | 1/2 cup | Adds sweetness and aromatic base |
| Chopped Bell Peppers | 1/2 cup | Contributes crunch and vibrant color |
| Fresh Spinach | 1 cup (chopped) | Adds nutrition and fresh green color |
| Salt | 1 tsp | Enhances overall flavor profile |
| Pepper | 1 tsp | Adds mild heat and depth |
| Garlic Powder | 1 tsp | Provides savory aromatic element |
| Italian Herbs | 1 tsp | Adds Mediterranean flavor complexity |
| Egg | 1 whole | Creates golden-brown finish when baked |
Tools
| Tool | Purpose |
|---|---|
| Large Skillet | Cooking meat and vegetable filling |
| Baking Sheet | Holding pies during baking process |
| Parchment Paper | Preventing sticking and easy cleanup |
| Rolling Pin | Rolling out pastry to desired thickness |
| Sharp Knife | Cutting pastry into uniform squares |
| Fork | Sealing edges and creating decorative pattern |
| Pastry Brush | Applying egg wash for golden finish |
How to Make Mini Flag Pies
| Step | Instructions |
|---|---|
| 1. Preparation | Preheat oven to 400°F (200°C) and line a baking sheet with parchment paper for easy removal |
| 2. Cook Filling | In a skillet over medium heat, cook ground meat until browned. Add onions and bell peppers; cook until softened |
| 3. Season | Stir in spinach and season with salt, pepper, garlic powder, and Italian herbs. Remove from heat |
| 4. Prepare Pastry | Roll out puff pastry sheets on a floured surface and cut into 5-inch squares |
| 5. Assemble | Place filling on one half of each square, top with cheese mixture, fold over, and seal edges using a fork |
| 6. Finish | Brush tops with whisked egg for a beautiful golden finish during baking |
| 7. Bake | Bake for 20–25 minutes until golden brown and pastry is fully cooked through |
Chef's Helpful Tips
- Thaw puff pastry completely before using to prevent cracking and ensure even rolling
- Cool the meat filling slightly before assembling to prevent melting the pastry prematurely
- Seal edges firmly with a fork to prevent filling from leaking during baking
- Don’t overfill the pastry squares as this can cause bursting during baking
- Brush egg wash evenly for consistent golden-brown color across all pies
Serving and Storage Tips
Serving Tips
Serve these mini flag pies warm for the best flavor and texture experience. The cheese will be perfectly melted and the pastry crispy when fresh from the oven.
Arrange them on a patriotic platter with red, white, and blue decorations. Consider serving alongside Ultimate Chicken Casserole for a complete meal spread.
These pies pair wonderfully with fresh salads or vegetable sides. They’re substantial enough to serve as a main course for lighter appetites or as hearty appetizers for larger gatherings.
Store leftover pies in the refrigerator for up to three days. Reheat in a 350°F oven for 5-7 minutes to restore crispiness. Avoid microwaving as it makes the pastry soggy.

Mistakes to Avoid
Don’t skip the egg wash step as it creates the beautiful golden-brown color that makes these pies so visually appealing. The egg wash also helps seal the pastry edges.
Avoid using frozen puff pastry directly from the freezer. Thaw it properly in the refrigerator overnight for best results and easier handling during assembly.
Don’t overfill the pastry squares with too much filling. This can cause the pies to burst open during baking and create a messy appearance.
Resist the urge to open the oven door frequently during baking. This can cause temperature fluctuations that affect the pastry’s rise and golden color development.
You Must Know
- Always seal the edges completely to prevent filling from leaking out during the baking process
- Let the meat filling cool slightly before assembly to prevent the pastry from becoming soggy
- Use parchment paper on your baking sheet to ensure easy removal and prevent sticking
- Check for doneness by looking for golden-brown color and listening for a hollow sound when tapped
Tips and Tricks for Mini Flag Pies
Prepare the filling a day ahead and store it in the refrigerator. This saves time on the day of your event and allows flavors to meld together beautifully.
Cut decorative vents in the top of each pie using a small knife. This prevents bursting and adds an attractive professional appearance to your finished pies.
Experiment with different cheese combinations. Try mixing sharp cheddar with pepper jack for extra flavor, or use cream cheese for added richness and smoothness.
Freeze assembled but unbaked pies for up to one month. Bake directly from frozen, adding 5-10 extra minutes to the cooking time for perfectly cooked results.
Suggestions for Mini Flag Pies
Create a themed menu by pairing these pies with other patriotic dishes. Consider serving them alongside Stars and Stripes Mini Pies for a complete celebration spread.
Transform the recipe into breakfast pies by adding scrambled eggs and breakfast sausage to the filling. This creates a perfect brunch option for holiday mornings.
Make vegetarian versions by substituting the ground meat with seasoned mushrooms, lentils, or plant-based protein alternatives. The flavor profile remains delicious and satisfying.
For dessert inspiration, check out these Fourth of July Desserts to complete your patriotic menu planning.
Serve with Creamy Garlic Shrimp Pasta for an elegant dinner party combination that impresses guests with variety and flavor.

FAQs:
Yes, you can assemble the pies up to 24 hours in advance and store them covered in the refrigerator. Brush with egg wash just before baking for the best golden color.
Reheat in a 350°F oven for 5-7 minutes to restore crispiness. Avoid microwaving as it makes the pastry soggy and less appealing.
Absolutely! Freeze assembled unbaked pies for up to one month. Bake directly from frozen, adding 5-10 extra minutes to the cooking time.
Try chicken and vegetables, turkey and cranberry, or vegetarian options with mushrooms and cheese. The possibilities are endless for customization.
Cool the filling slightly before assembly and avoid overfilling. Make sure your oven is fully preheated before baking for the crispiest results.
Conclusion
Mini flag pies represent the perfect combination of delicious flavor and patriotic presentation. These versatile treats work beautifully for any celebration where you want to show your national pride while serving something truly tasty.
The recipe’s flexibility allows for endless customization options, making it suitable for various dietary preferences and flavor profiles. Whether you’re hosting a backyard barbecue or attending a potluck dinner, these pies are guaranteed crowd-pleasers.
With proper preparation and attention to technique, you’ll create beautiful, golden-brown pies that taste as good as they look. Start planning your next patriotic gathering around these delightful mini flag pies!
More Easy Breakfast Recipes:
- Mediterranean chickpea salad amazing recipe with feta cheese
- Ricotta Fig Toast: Perfect Breakfast Recipe in 10 Minutes
- Breakfast Pizza Arugula: Amazing Morning Recipe Ready in 20 Min
- How to Make Healthy and Delicious Breakfast Cookies
Recommended

📖 Recipe Card
Mini Flag Pies
- Total Time: 45 minutes
- Yield: 8 mini pies 1x
Description
Delicious savory mini pies filled with seasoned ground meat, vegetables, and cheese, wrapped in golden puff pastry. Perfect for parties, lunch, or a quick dinner.
Ingredients
- 1 lb ground meat
- 1 medium onion, diced
- 1 bell pepper, diced
- 2 cups fresh spinach
- 1 tsp salt
- 1/2 tsp black pepper
- 1 tsp garlic powder
- 1 tsp Italian herbs
- 2 sheets puff pastry, thawed
- 1 cup cheese mixture
- 1 egg, whisked
- All-purpose flour for dusting
Instructions
- Preparation: Preheat oven to 400°F (200°C) and line a baking sheet with parchment paper for easy removal
- Cook Filling: In a skillet over medium heat, cook ground meat until browned. Add onions and bell peppers; cook until softened
- Season: Stir in spinach and season with salt, pepper, garlic powder, and Italian herbs. Remove from heat
- Prepare Pastry: Roll out puff pastry sheets on a floured surface and cut into 5-inch squares
- Assemble: Place filling on one half of each square, top with cheese mixture, fold over, and seal edges using a fork
- Finish: Brush tops with whisked egg for a beautiful golden finish during baking
- Bake: Bake for 20–25 minutes until golden brown and pastry is fully cooked through
Notes
- Thaw puff pastry completely before using to prevent cracking and ensure even rolling
- Cool the meat filling slightly before assembling to prevent melting the pastry prematurely
- Seal edges firmly with a fork to prevent filling from leaking during baking
- Don’t overfill the pastry squares as this can cause bursting during baking
- Prep Time: 20 minutes
- Cook Time: 25 minutes
- Category: Appetizer / Snack
- Method: Baking
- Cuisine: International
Nutrition
- Serving Size: 1 serving (2 mini pies)
- Calories: 485 calories
- Sugar: 4g
- Sodium: 720mg
- Fat: 28g
- Saturated Fat: 12g
- Unsaturated Fat: 16g
- Trans Fat: 0g
- Carbohydrates: 32g
- Fiber: 3g
- Protein: 28g
- Cholesterol: 95mg
Keywords: mini flag pies, savory pies, puff pastry, ground meat, handheld pies, party food