Jump to:
Mini Pumpkin Pie Cups
Mini pumpkin pie cups are the perfect bite-sized dessert that brings all the cozy flavors of fall into a convenient, individual serving. These delightful treats combine the creamy richness of traditional pumpkin pie with the convenience of portion-controlled cups, making them ideal for gatherings, meal prep, or when you want to satisfy your pumpkin cravings without committing to a full pie.
Why You'll Love This Recipe
- Perfect portion control that helps you enjoy dessert without overindulging while maintaining balanced eating habits
- Budget-friendly recipe costing approximately $8-10 total, serving multiple people affordably during expensive holiday seasons
- Naturally gluten-free and dairy-free options make them inclusive for guests with dietary restrictions and food sensitivities
- Quick 45-minute total time from prep to finish, ideal for busy schedules and last-minute entertaining needs
- Rich in vitamin A and fiber from pumpkin, supporting eye health and digestive wellness while satisfying sweet cravings
Why These Mini Pumpkin Pie Cups Work
The magic behind these mini pumpkin pie cups lies in their simplified approach to classic pumpkin pie. By using coconut oil instead of butter and pure maple syrup as a natural sweetener, you create a dessert that’s both healthier and incredibly flavorful.
The individual serving size prevents overconsumption while ensuring everyone gets the perfect crust-to-filling ratio. The combination of warm spices like cinnamon and nutmeg creates that nostalgic fall flavor profile that makes these cups irresistible.
These cups are perfect for family dinner gatherings where you want to offer a lighter dessert option that still feels indulgent and special.

What You’ll Need for Perfect Mini Pumpkin Pie Cups
Ingredients
| Ingredient | Quantity (Approx) | Purpose / Notes |
|---|---|---|
| Gluten-free graham cracker crumbs | 1 cup | Creates the sweet, crunchy crust base |
| Coconut oil (melted) | 1/4 cup | Binds crust ingredients together |
| Pure maple syrup | 1/4 cup + extra | Natural sweetener for both crust and filling |
| Canned pumpkin puree | 1 cup | Main flavor component, rich in vitamins |
| Ground cinnamon | 1 teaspoon | Warm spice for classic pumpkin flavor |
| Ground nutmeg | 1/2 teaspoon | Adds depth and warmth to filling |
| Salt | Pinch | Enhances overall flavor balance |
Tools
| Tool | Purpose |
|---|---|
| Mini muffin tin | Creates perfect individual cup shapes |
| Mixing bowls | Separate preparation of crust and filling |
| Measuring cups | Ensures accurate ingredient proportions |
| Whisk | Creates smooth, lump-free filling mixture |
The beauty of this recipe lies in its simplicity and accessibility. Most ingredients are pantry staples, and the tools required are basic kitchen essentials. This makes it perfect for spontaneous baking sessions or when you want to involve kids in the cooking process.
For those following specific dietary needs, these ingredients naturally accommodate gluten-free and dairy-free requirements. The total cost ranges from $8-10, making it an economical dessert choice for feeding groups. You can find inspiration for more healthy dessert alternatives that work well alongside these cups.
How to Make Mini Pumpkin Pie Cups
| Step | Instructions |
|---|---|
| 1. Prep | Preheat oven to 350°F (175°C) and grease mini muffin tin thoroughly |
| 2. Make Crust | Mix graham cracker crumbs, melted coconut oil, and maple syrup until resembling wet sand |
| 3. Form Cups | Press crust mixture firmly into mini muffin tin bottoms and slightly up sides |
| 4. Pre-bake | Bake crusts for 8-10 minutes until golden brown and set |
| 5. Prepare Filling | Whisk pumpkin puree, maple syrup, cinnamon, nutmeg, and salt until completely smooth |
| 6. Fill Cups | Divide pumpkin mixture evenly among pre-baked crusts |
| 7. Final Bake | Bake 15-20 minutes until filling is set and slightly firm to touch |
| 8. Cool | Let cool in pan for 10 minutes before carefully removing |
The key to success lies in achieving the right consistency for both components. Your crust should hold together when pressed but not be overly wet. The filling should be smooth and pour easily but not too thin.
Chef's Helpful Tips
- Use room temperature ingredients for smoother mixing and better texture integration in your final product
- Press crust firmly with the back of a spoon to prevent crumbling when removing from tins
- Test doneness by gently touching the center – it should spring back slightly when properly set
- Cool completely before removing to prevent breaking, as the filling continues to set during cooling
- Line muffin tins with paper liners for easier removal and more professional presentation
Serving and Storage Tips for Mini Pumpkin Pie Cups
Serving Tips
These mini pumpkin pie cups shine brightest when served at room temperature or slightly chilled. Top each cup with a small dollop of coconut whipped cream or a sprinkle of cinnamon for extra elegance.
For special occasions, arrange them on a tiered serving stand alongside other fall desserts. They pair beautifully with warm beverages like spiced tea or coffee. Consider serving them after hearty meals like savory pasta dishes for a perfect flavor balance.
Store leftover cups in the refrigerator for up to 5 days in an airtight container. They actually taste better after a day as flavors meld together. For longer storage, freeze for up to 3 months, thawing overnight in the refrigerator before serving.

Mistakes to Avoid While Making Mini Pumpkin Pie Cups
One common mistake is over-mixing the filling, which can create a dense, heavy texture instead of the desired creamy consistency. Mix just until ingredients are combined and smooth.
Another frequent error is not pre-baking the crust adequately. A soggy bottom crust ruins the entire dessert experience. Ensure your crust is golden and set before adding the filling.
Don’t skip the cooling period. Removing cups too early from the tin will cause them to break apart. Patience during cooling ensures perfect presentation and structural integrity.
You Must Know
- Always use pure pumpkin puree, not pumpkin pie filling, which contains added sugars and spices that will throw off your recipe balance
- Coconut oil should be melted but not hot when mixing, as hot oil can make your crust mixture too wet and difficult to work with
- Mini muffin tins vary in size, so adjust baking time accordingly – smaller cups cook faster than larger ones
- These cups are naturally dairy-free and can be made vegan by ensuring your graham crackers don’t contain honey
Suggestions for Mini Pumpkin Pie Cups
Transform these basic cups into gourmet treats by adding chopped pecans or walnuts to the crust mixture for extra crunch and flavor depth. A pinch of ginger or allspice in the filling creates more complex spice notes.
For chocolate lovers, drizzle melted dark chocolate over cooled cups or add mini chocolate chips to the crust. Create a caramel version by swirling sugar-free caramel sauce into the filling before baking.
Make them holiday-special by garnishing with candied orange zest or a light dusting of powdered sugar. For inspiration on similar individual desserts, check out these mini pumpkin pies or try pumpkin tarts for variation.

FAQs:
Yes, these cups are perfect for make-ahead preparation. You can bake them up to 3 days in advance and store them covered in the refrigerator. They actually taste better after the flavors have had time to meld together.
You can substitute melted butter, vegetable oil, or even applesauce for coconut oil. Each will create slightly different textures – butter makes it richer, while applesauce creates a lighter crust.
The filling should be set and spring back lightly when touched in the center. The edges may appear slightly darker, and a toothpick inserted should come out mostly clean with just a few moist crumbs.
Absolutely! Wrap individual cups in plastic wrap and store in freezer bags for up to 3 months. Thaw overnight in the refrigerator before serving for best texture and flavor.
Yes, these mini cups offer better portion control and use natural sweeteners like maple syrup instead of refined sugar. The pumpkin provides vitamin A, fiber, and antioxidants while the smaller size helps prevent overindulgence.
Conclusion
Mini pumpkin pie cups deliver all the comfort and flavor of traditional pumpkin pie in a perfectly portioned, healthier package. With their simple ingredient list, quick preparation time, and impressive presentation, they’re destined to become your go-to fall dessert.
Whether you’re hosting a dinner party, contributing to a potluck, or simply treating your family to something special, these cups offer the perfect balance of indulgence and mindful eating. The natural sweetness from maple syrup and the nutritional benefits of pumpkin make them a dessert you can feel good about serving.
Start making these delightful mini pumpkin pie cups today and discover how something so simple can bring such joy to your autumn celebrations.
More Easy desserts Recipes:
- S’mores Milkshake Recipe: Amazing Creamy Campfire Treat
- Perfect Pastel Halloween Candy Apples Recipe – Easy Guide
- Frozen Yogurt Bark Recipe – Easy Healthy Dessert in 10 Min
- French Butter Cake Recipe – Easy Moist Homemade Dessert
Recommended

📖 Recipe Card
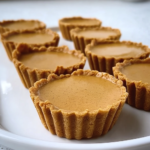
Mini Pumpkin Pie Cups
- Total Time: 45 minutes
- Yield: 8-10 total, serving 1x
Description
Delicious gluten-free and dairy-free mini pumpkin pie cups with a graham cracker crust and spiced pumpkin filling. Perfect individual desserts that are naturally sweetened with maple syrup.
Ingredients
- 1 cup gluten-free graham cracker crumbs
- 1/4 cup coconut oil (melted)
- 1/4 cup + extra pure maple syrup
- 1 cup canned pumpkin puree
- 1 teaspoon ground cinnamon
- 1/2 teaspoon ground nutmeg
- Pinch salt
Instructions
- Prep: Preheat oven to 350°F (175°C) and grease mini muffin tin thoroughly
- Make Crust: Mix graham cracker crumbs, melted coconut oil, and maple syrup until resembling wet sand
- Form Cups: Press crust mixture firmly into mini muffin tin bottoms and slightly up sides
- Pre-bake: Bake crusts for 8-10 minutes until golden brown and set
- Prepare Filling: Whisk pumpkin puree, maple syrup, cinnamon, nutmeg, and salt until completely smooth
- Fill Cups: Divide pumpkin mixture evenly among pre-baked crusts
- Final Bake: Bake 15-20 minutes until filling is set and slightly firm to touch
- Cool: Let cool in pan for 10 minutes before carefully removing
Notes
- Use room temperature ingredients for smoother mixing and better texture integration in your final product
- Press crust firmly with the back of a spoon to prevent crumbling when removing from tins
- Cool completely before removing to prevent breaking, as the filling continues to set during cooling
- Line muffin tins with paper liners for easier removal and more professional presentation
- Prep Time: 15 minutes
- Cook Time: 30 minutes
- Category: Dessert
- Method: Baking
- Cuisine: American
Nutrition
- Serving Size: 1 mini cup
- Calories: 145 calories
- Sugar: 12g
- Sodium: 85mg
- Fat: 6g
- Saturated Fat: 5g
- Unsaturated Fat: 1g
- Trans Fat: 0g
- Carbohydrates: 24g
- Fiber: 2g
- Protein: 2g
- Cholesterol: 0mg
Keywords: mini pumpkin pie cups, gluten-free dessert, dairy-free, pumpkin recipe, individual desserts, healthy dessert